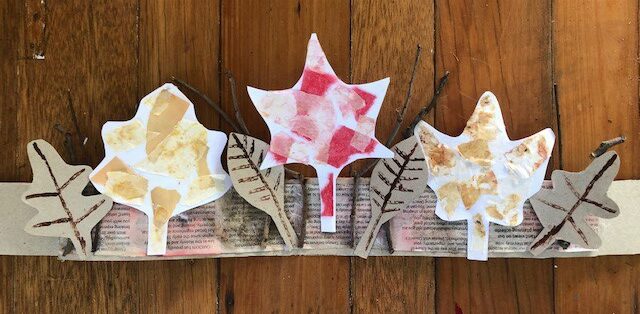
We are yet to feel the cooler days that Autumn brings, however we can still have fun
exploring the colours, shapes and textures of this season by creating these Autumn crowns.
This project will require a bit of rummaging, but you should be able to utilise many things
you already have at home.
I have used an old cereal box cut into strips of equal thickness to make the headband base,
newspaper, some white card (if this isn’t available you could glue two pieces of copy paper
back to back to achieve thickness), tissue paper, baking paper and a brown lunch bag for
collage, a paintbrush, PVA glue, hot glue gun, scissors, and a stapler. In addition, if you are
keen to explore alternate ways of creating natural, subtle colours, you will need coffee
grounds, turmeric mixed with water, beetroot slices and an old teabag. Otherwise, you
could use watercolour paint.
Firstly, let’s begin by using our natural dyes. I had fun applying the food based dyes to my
white tissue paper. I scrunched the tissue paper up beforehand to encourage the dyes to
run into the creases thereby creating variations in colour. When you are happy with your
colours find a sunny patch and put the tissue paper aside to dry.
Now create the headband base by cutting your cereal box into 2 or 3 strips of equal
thickness. Staple the strips end to end to create the length you need. Collage your headband
with a bit of newspaper and set aside.
Time to get outdoors to hunt for leaves and sticks of different shapes, sizes, and colours.
Study the leaves, paying particular attention to the shape, and draw three big leaves on your
white card. Now use the cereal box remnants to make some smaller leaves. Cut all the
leaves out neatly.
By now the tissue paper should be dry and ready to use for collage! Tear the tissue paper
into a few small pieces, then do the same with the other types of paper you have selected.
Collage the paper pieces onto the leaves with PVA, or if not available, glue stick will do the
job.
Time to assemble our crowns! Lay out all your leaves, and sticks if you’re using them, onto
the headband base. It’s important to encourage play with the placement of pieces before
gluing so your small friend can explore a number of possibilities and ways of placing things.
When you’re happy with the design, work at gluing everything in place. If you are
incorporating sticks, PVA or hot glue will work best.
Allow your crown to dry, staple the headband to correct size and enjoy! Children will love
the functionality of their wearable art, and what better show and tell than one they have made themselves.